.svg "SpotDevLogoOrange (2)")
Conversion tracking is vital for every form of marketing that you conduct - and Google Ads is no different.
There are various conversions that Google Ads helps to track, such as website purchases, leads generated or even app downloads. However, one of the little known and used conversions that should be tracked are the number of phone calls that you are receiving as a result of your PPC activity.
This post will focus on call tracking and, in particular, calls to numbers displayed on your website (even within call tracking there are various options, including tracking calls from ads using call extensions or call-only ads, as well as clicks on the phone number itself on your mobile website).
This particular function works by showing a unique number to each visitor to your website. This requires a Javascript code - that is provided by AdWords - to be pasted into the website’s code.
This article will demonstrate, step-by-step, how to obtain the Javascript code and set up call tracking in Google Ads:
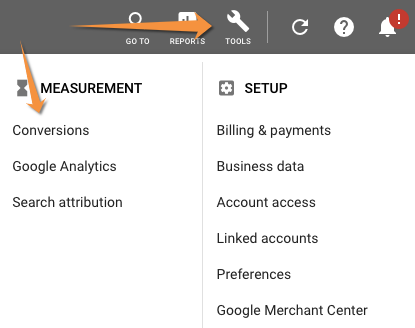
1) Sign into your Google Ads account, click on 'Tools', and then select 'Conversions'.
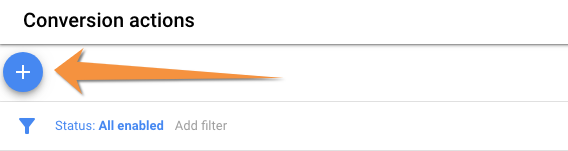
2) On the next screen, click on the blue add button.
3) Having clicked on the button, you’ll be shown a few sources of conversions you can track, including web purchases. However, in this case, we’re interested in the third option from the left - 'Phone calls'. Click on the 'Select' button. You’ll then be presented with a pop up, like the one below:
![]()
From the three options provided, we’re interested in the second - 'Calls to a telephone number on your website'. So, click on that and then on the 'Continue' button.
4) This will then take you to a screen where have to enter the following:
- Name - here you’ll give your conversion a name. We advice to name it something descriptive and meaningful to you and your business. For example, you may want to call it “Calls to X Office” or “Calls to X Firm”.
- Value - does a call to your business have a monetary value? Of course, the answer to this will be different from business to business. If it does, you are given the opportunity to assign the figure having clicked on the 'Value' option. If however, your business doesn’t, you can simply select the option 'Don’t assign a value'.
- Call length - this option considers how long a call needs to last to be counted as a conversion. This figure can be completely unique to your business. For instance, it may be that a call needs to last a minute or even 30 seconds before you can count it as a conversion.
- Count - Here you get to choose how you’d like to count your conversion and are given the options of 'Every' or 'One'. The option 'Every' means that if one ad click leads to five calls, that will count as five conversions. On the other hand, 'One' count means if one ad click leads to five calls, that will count as one conversion.
- Conversion window - This allows you to choose how long after a click you'd like to track conversions. You’ll be provided with a drop down menu to choose from ranging from 1 week to 60 days. There’s even a 'Custom' option, so the system is flexible in letting you choose.
- Category - From 'Lead', 'Sign up', 'Purchase/Sale' and 'Other', choose a category that best fits your conversion action. This is important as it will help you evaluate similar conversions in your reports.
- Include in “Conversions” - By answering 'Yes' to this option, the data for this conversion will be included in your 'Conversions' column when reporting, which is used by any conversion-based bid strategies you might have set up.
Once you’ve filled in the above fields, click on the 'Save and continue' button.
5) The next step involves you deciding whether you want to enter your phone number as it appears on your website or edit your website code manually. The latter option is more advanced, and is recommended only if you’re comfortable using JavaScript.
Should you wish to opt for the former, simply type in your phone number as displayed on your website. Having done this, click on the 'Create tag' button. This will automatically generate a tag for you as displayed in the screenshot below.
![]()
The tag should be copied and pasted to the page where your phone number appears on your website.
If you have experience working with the code of your website, then adding this code might not be a problem for you. However if you’re not comfortable, then simply click on the 'Email instructions and tag' button and send it to your webmaster (or whoever is responsible for the backend of your website).
Once all this has been done, click on the 'Done' button.
6) The final step involves creating at least one call extension and making sure it’s applied to the campaign that you want to track. Here’s how to create a call extension:
From the screen you’re in, click on the 'adds and extensions' menu option at the side of the screen, then click on the 'extensions' sub tab, then select 'call extension'.
You will then be prompted to fill in some details, as below. 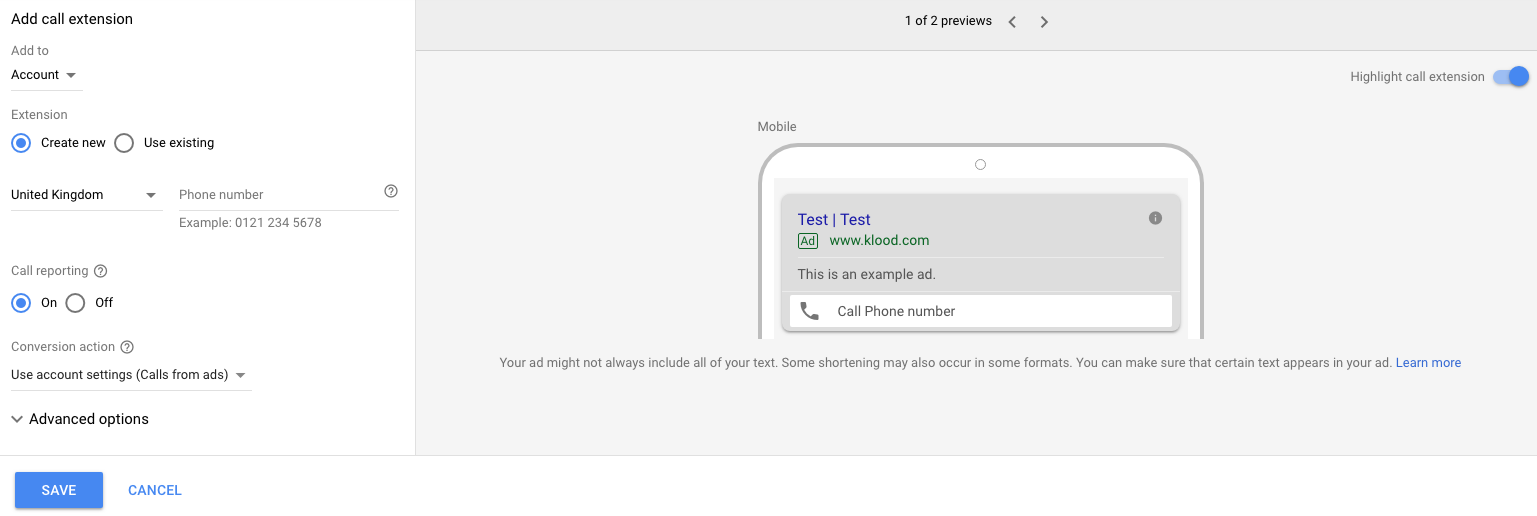
As can be seen from the post, there are quite a few steps involved. However, they are not very time consuming, so I highly recommend setting this up as it will give you a good indication of how many calls you are receiving off the back of the number on your website.
Click the button below to request a free PPC assessment conducted by one of our Google Ads specialists.
Our content includes affiliate links. This means that we may receive a commission if you make a purchase through one of the links on our website. This will be at no cost to you and helps to fund the content creation work on our website.