.svg "SpotDevLogoOrange (2)")
Getting your filters right is a critical part of making sure that you’re looking at accurate data in Google Analytics, and making the right judgements based on that data. But this information can be skewed by inaccurate information, such as internal sessions, traffic from spammers, or duplicate pages.
With the help of a few Google Analytics filters you can modify the data in your account to increase accuracy and make it more meaningful for your business. This article will cover some filters which can help you achieve this:
- Excluding IP addresses;
- Excluding referral spam;
- Changing how ‘(not provided)’ data is displayed;
- Forcing URLs to display as lowercase;
- Filtering internal only traffic for testing purposes.
Before you get started on making changes, make sure that you have an unfiltered view set-up in Google Analytics. This way you’ll always have the original data to keep as a back-up. We recommend you set up your Google Analytics in a way that gives you a view for unfiltered data, a test view, and a master view for reporting on.
Excluding IP addresses
If colleagues are spending a large amount of time on your website it’s important to exclude their IP addresses from Google Analytics. Whilst this is one of the simplest filters to implement, it’s one that can noticeably increase the accuracy of your data.
This is simply because it prevents your data from being skewed by their time spent and actions taken on your website. When creating a filter to exclude IP addresses, just follow these steps:
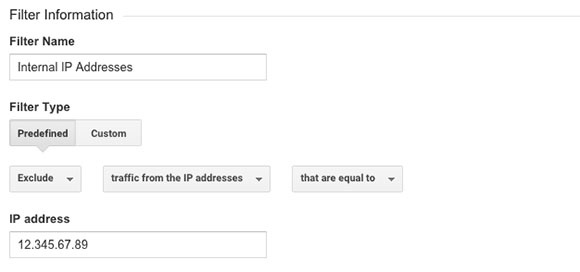
- Visit the ‘admin’ tab and select your desired ‘view’;
- Click on ‘filters’ and select ‘add filter’;
- Enter a name for the filter. For example, “Internal IP Addresses”;
- Under filter type select ‘predefined’;
- Select the options ‘exclude’, ‘traffic from the IP addresses’, ‘that are equal to’;
- Enter the IP address in the box provided.
Once you’ve completed these steps, the filter will look similar to this:
Finding your IP address is simple enough, just type ‘what’’s my IP’ into Google and it will be shown. Just be aware, your office may use a range of IP’s.
Excluding referral spam
Referral spam is essentially fake visits to your website from third parties. Referral spam can be very irritating in Google Analytics as every fake visit is counted in reporting data and therefore it distorts its accuracy.
Although there are numerous spam referral websites, these can be excluded by creating filters which target regular expressions. There are many guides available which provide the exact regular expressions to use, and one of our favourites is Ben Travis’ guide to removing referral spam, which is updated regularly to cover new spam referrers.
By following the steps in the guide and using the regular expressions provided, you can exclude referral spam visits from your data. There are three types of filter you need to set up: a hostname filter, a screen resolution filter and several filters to remove spam crawlers.
Hostname filter
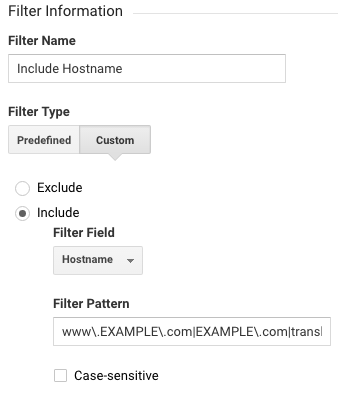
A hostname filter allows you to filter out the bulk of referral spam by only including data where the user actually visited a page on your site. This is because the majority of referral spam is simply fired at your Google Analytics tracking ID and, thus, never actually visits your site. Even better, it’s easy to set up.
- Visit the ‘Admin’ tab and select your desired ‘view’;
- Click on ‘Filters’ and select ‘Add filter’;
- Give your filter a name such as, ‘Include Hostname’;
- Under filter type select ‘custom’ followed by ‘include’;
- Choose ‘Hostname’ for the filter field;
- Add in the following ‘www\.EXAMPLE\.com|EXAMPLE\.com|translate\.googleusercontent\.com|webcache\.googleusercontent\.com’
Screen Resolution Filter
While a Hostname filter will remove a large amount of spam, it won’t stop some of the spam crawlers that crawl the site. In order to remove these a screen resolution filter, as well as spam crawler filters, are recommended.
The screen resolution filter works by removing sessions that have a screen resolution of (not set), which come from bots and crawlers rather than legitimate users who would have a screen size set.
To set up this filter, follow these steps:
- Visit the ‘admin’ tab and select your desired ‘view’;
- Click on ‘filters’ and select ‘add filter’;
- Give your filter a name such as, “Screen Resolution Filter”;
- Under filter type select ‘custom’ followed by ‘exclude’;
- Choose ‘Screen Resolution’ for the filter field;
- Add in the following: ^\(not set\)$
After doing this, your filter should look like the below: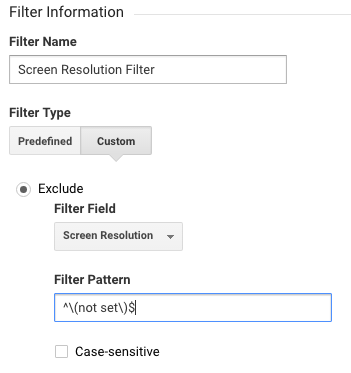
The below steps have been provided for setting up these filters. You will need to set up one filter per regular expression.
- Visit the ‘Admin’ tab and select your desired ‘view’;
- Click on ‘Filters’ and select ‘Add filter’;
- Give your filter a name such as, ‘Exclude Web Spam’;
- Under filter type select ‘Custom’ followed by ‘Exclude’;
- Choose ‘Campaign source’ for the filter field;
- Enter the regular expression from Ben Travis’ guide as the filter pattern.
After completing these steps, your filter will look similar to this:

‘(not provided)’ filter
When Google moved to making all searches secure in September 2013, this led to a sharp increase in ‘(not provided)’ data. This is because the search query used to visit websites through Google’s results pages is encrypted and therefore can’t be understood. Due to this, Google has grouped this encrypted data under ‘(not provided)’ in organic keyword reports.
Although this encrypted data can never be fully uncovered, Dan Barker from eConsultancy has discussed a method of using filters to alter how this data is shown. This is by replacing occurrences of ‘(not provided)’ with the landing pages that users have visited to provide insight into the intent behind ‘(not provided)’ visits. Whilst this can give us some insight into the type of content which users are searching for, it also highlights the percentage of ‘(not provided)’ visits which land on the homepage.
So, using this method we can gain an idea of the brand vs. generic keyword split, as brand queries are likely to result in more homepage visits.
Dan Barker has written a blog post called ‘How to Steal Some ‘not provided’ Data Back from Google’ which compares data before and after the filter is applied.
When looking at how to set-up the filter in Google Analytics, the below steps have been provided. It’s important to implement this filter in its own unique view as it’ll change how data is displayed.
- Visit the ‘Admin’ tab to select your desired ‘view’;
- Click on ‘Filters’ and select ‘Add filter’;
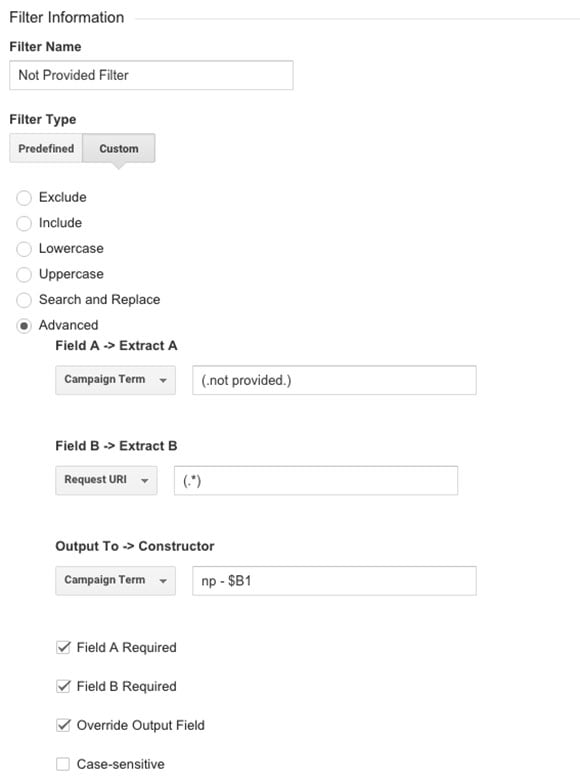
- Give your filter a name. For example, ‘Not Provided Filter’;
- Select ‘Custom’ followed by ‘Advanced’;
- For ‘Field A -> extract A’ select ‘Campaign term’ and write ‘(.not provided.)’;
- For ‘Field B -> extract B’ select ‘Request URI’ and write ‘(.*)’;
- For ‘Output to -> constructor’ select ‘Campaign term’ and write ‘np - $B1’;
- Select the options ‘Field A required’, ‘Field B required’ and ‘Override output field’.
After completing these steps, your filter will look similar to this:
Filter internal traffic only
This filter is essentially the opposite of excluding your IP address to filter out any internal traffic, as it will show you activity from your IP address only. This is useful to test goals, filters and other Google Analytics settings without impacting the rest of your data.
For example, you can complete a test action on a website and know quickly and confidently if your settings are working correctly.
Due to the nature of this filter, it’s important that it’s created in its own unique view. This will ensure that it’s not applied to all of your data. The set-up for this is simple and has been outlined below:
- Visit the ‘Admin’ tab and select your desired ‘view’;
- Click on ‘Filters’ and select ‘Add filter’;
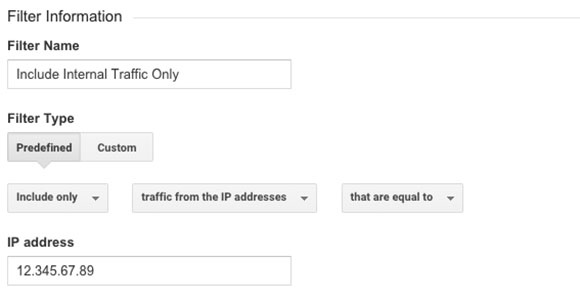
- Enter a name for the filter. For example, ‘Include Internal Traffic Only’;
- Under filter type select ‘Predefined’;
- Select the options ‘Include only’, ‘Traffic from the IP addresses’, ‘That are equal to’;
- Enter the IP address in the box provided.
Once you’ve completed these steps, the filter will look similar to:
Display all URLs as lowercase
It’s not uncommon for websites to have duplicate content which is only differentiated by the case of the URL. For example, if www.example.com/Blog and www.example.com/blog are exactly the same page.
Although this should be corrected for SEO reasons, as these pages are duplicate content, we can clean up the data in Google Analytics until this issue has been corrected. This will ensure that the data for this page is aggregated rather than displayed as two separate rows. Whilst this will save you time when analysing the data, it’ll also ensure that we’re analysing the overall performance of a page. The set-up for this filter has been outlined below:
- Visit the ‘Admin’ tab to select your desired ‘view’;
- Click on ‘Filters’ and select ‘Add filter’;
- Enter a name for the filter. For example, ‘Force URL to Lowercase’;
- Under filter type select ‘Custom’ and choose ’Lowercase’;
- Select ‘Request URL’ as the filter field.
After completing these steps, your filter will look similar to this:

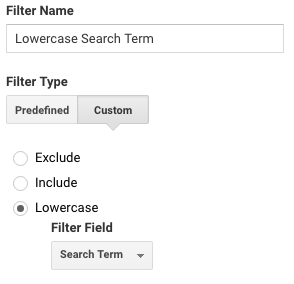
Lowercase Search Term
This simple filter puts all search terms used into lowercase, helping to consolidate your analytics data. For this filter, follow these steps:
- Visit the ‘Admin’ tab to select your desired ‘view’;
- Click on ‘Filters’ and select ‘Add filter’;
- Enter a name for the filter. For example, ‘Lowercase Search Term’;
- Under filter type select ‘Custom’ and choose ‘Lowercase’;
- Select ‘Search Term’ as the filter field.
Your filter should look like the below:
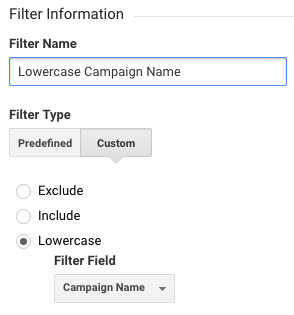
Lowercase Campaign Dimensions (Name/Source/Medium/Term/Content)
Lowercase campaign dimensions can help you if you are using the URL Builder to generate campaign URL’s for easier tracking and attribution of marketing campaigns. In case some of these fields were entered with capitals, you can filter all the entries down to one set of campaigns. Just repeat the below filter for each campaign dimension:
- Visit the ‘Admin’ tab to select your desired ‘view’;
- Click on ‘Filters’ and select ‘Add filter’;
- Enter a name for the filter. For example, ‘Lowercase Campaign Name’;
- Under filter type select ‘Custom’ and choose ‘Lowercase’;
- Select ‘Campaign Name’ as the filter field.
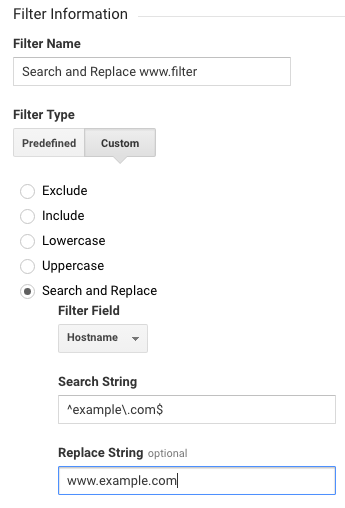
Search and replace www. filter
If your website can be accessed using both www. And non www., you may want to use this filter to consolidate down your data.To add this, use the following configuration:
- Visit the ‘Admin’ tab to select your desired ‘view’;
- Click on ‘Filters’ and select ‘Add filter’;
- Enter a name for the filter. For example, ‘Search and Replace www.’;
- Under filter type select ‘Custom’ and choose ’Search and Replace’;
- Select ‘Hostname’ as the filter field;
- Enter the following: ^example\.com$ as the Search String;
- Enter the following www.example.com as the Replace String.
Overall, there are many different filters which can be applied to Google Analytics. Whilst some can increase the accuracy of your data, such as excluding IP addresses, others can provide a new layer of insight. This in turn can help you make better and more informed decisions.
Do you want to increase the effectiveness of your Inbound Marketing campaigns?
Download the guide that turns your efforts into leads today.
Our content includes affiliate links. This means that we may receive a commission if you make a purchase through one of the links on our website. This will be at no cost to you and helps to fund the content creation work on our website.